Creating a Stone Lithograph

Litho Pencil and Exacto Knife
Lithography was developed in Germany by playwright Alois Senefelder (1771-1834) using limestone as the vehicle to transfer an image onto paper. It was initially used as a commercial printing process, especially for the duplication of scripts and illustrations in books. Artists realized that this medium was also an excellent way to create multiple images. Artists Delacroix and Goya, among many others, mastered the technique. Later, painters such as Picasso, Miro and Chagall embraced lithography to create fine art.
The word lithography comes from Greek, meaning “to write or draw on stone”. Lithography is a planographic medium in which the image and non-image are on the same surface. With other print-making techniques such as intaglio (etching, mezzotint, engraving), the image is either engraved or acid etched into a plate. In relief (woodblock, linocut), the non-image (unprinted) area is cut away. In lithography the separation of the image and non-image areas is achieved primarily through the principle that oil repels water, together with a chemical reaction resulting when a solution called an etch is applied to the stone.
The following pictures show an abbreviated demonstration of the steps involved in creating an original stone lithograph.

Graining
Most litho stones used throughout the world come from a quarry north of Munich known for limestone of superior quality. A new litho stone is about 4 in. thick. and can be used for many years. After each use, the stone must be grained or ground with a stainless steel disk called a levigator and a mixture of water and abrasive grit (carborundum). Subsequent grindings with finer grit leave the stone smooth and flat in preparation for the next image.

Creating line drawing
A line drawing of the image (incomplete and lacking detail) is usually first drawn on a piece of tracing paper or sheet of clear acetate. Some artists create directly on the stone.
The art work on the stone must appear in mirror image of the actual, thus the need for making the drawing on a transparent material. The line drawing is placed face down onto the stone. A sheet of paper smeared with iron oxide powder is placed between the tracing paper and the stone, to act much like carbon paper. Using a pen or similar pointed instrument, the artist traces the drawing leaving its outline on the stone.

Tracing onto the stone
The artist then draws over the red outline and begins adding all the detail needed to create the image.
The freshly ground stone is highly sensitive to grease. Anything with grease content may be used to create the image, be it liquid or a special litho pencil, similar to a grease pencil. The time required to create the image depends on the complexity of the image.
(B/W Photographs on this page taken by Martin Hunt at Malaspina Printmakers Society Workshop, Vancouver, Canada)

And now for the magic...
Once the image is completed, it must be “fixed” on the stone. The simple law: water and oil don't mix, the inherent sensitivity of limestone to grease, and the application of an etch to the litho stone, all combine to create the magic of lithography. Since the image and non-image areas are on the same surface, unlike in other print-making media, the image is separated on the stone in a chemical process using an etch. An etch is a solution of gum arabic and nitric acid. The grease-based image is resistant to the water soluble etch solution, therefore, only the non-image area of the stone accepts the solution and a chemical reaction occurs. Processing the stone is critical. A successful printing demands proper care and expertise at this stage, and any errors could destroy the image. It would then be necessary to begin again at square one - graining and recreating the image.

Processing the stone
There are several steps to process the stone before printing can begin. Rosen powder is sprinkled over the image, then wiped off. A coating of talcum powder follows and is also wiped off. This is done to stabilize the rather delicate nature of the drawing.

Applying the “etch” solution
The etch solution is applied with a brush, coating the entire top surface of the stone. The image area is impervious to this application (oil and water) while the limestone is receptive to the solution. The etch is then removed with cheesecloth by buffing the surface of the stone vigorously and smoothly.
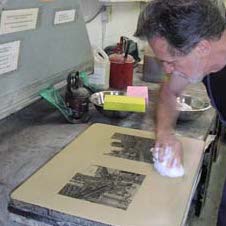
Inking the image with rubber roller.
Next, the original drawing material (i.e. litho pencil marks) is removed by pouring OIL-based solvent over the surface of the stone and rubbing with a clean rag until the entire image is washed out. A thin layer of ink (all litho inks are OIL based) is then wiped across the image area with a clean rag. Next, using a sponge and water, the layer of WATER soluble gum etch is removed.
Buffing and drying the etch on the stone.
Once the image is fully inked, the stone is allowed to dry. Another application of rosen, talcum and etch solutions follows.
It is necessary to repeat this process several times in order to make the image as stable as possible before proceeding to the printing stage. It takes about one hour to apply each etch, from the time of washing out the image, to rolling the ink and the application and drying of the etch. The last etch remains on the stone until printing.

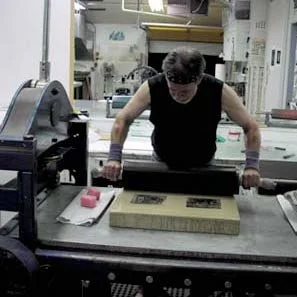
Placing the paper onto the inked stone.

Pulling pressure bar down onto stone.
The stone is covered by a sheet of plexigas (tympan). As the stone glides beneath the scraper bar which is greased, the paper is pushed down onto the inked image on the stone transferring the ink onto the paper.


Pulling the finished print
Once the pressure bar is lifted, the press bed is cranked back, tympan and backing removed and the printed paper is peeled off the stone and placed on drying rack. Litho inks do not contain chemical driers so paper must be air dried over several days before removing from drying rack.